How to Use the Lineup Builder to Your Advantage#
A great lineup doesn’t happen by accident. It reflects your priorities as a coach: player development, fairness, and putting your team in a position to succeed.
But turning those priorities into an actual inning-by-inning lineup can be time-consuming and difficult to get right, especially when you’re balancing multiple goals at once.
The Lineup Builder is designed to take that pressure off. Instead of starting from scratch every game, you can set your configuration up front and generate a lineup that already fits what you’re trying to accomplish.
From there, you stay in control - adjusting, refining, and locking in decisions as needed.
The result is a faster, more consistent process that helps you spend less time planning and more time coaching.
Understanding the Lineup Builder Layout#
Before jumping into building a lineup, it helps to understand how the page is organized. Each section has a specific role, and together they give you full control over planning for a game.
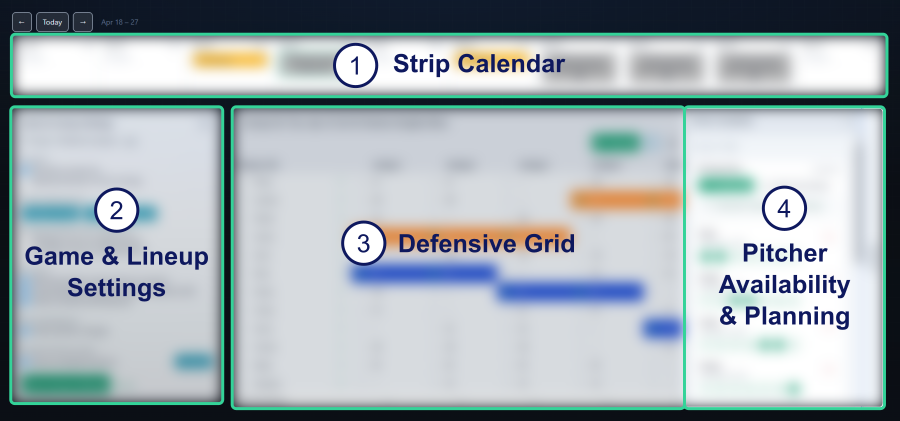 Basic layout of the Team Lineup page
1. Strip Calendar#
The strip calendar at the top shows your team’s schedule, showing only games and practices.
You can scroll left and right to move through dates and select any event. Once selected, everything on the page updates to that specific game; this is the lineup you’re building.
2. Game & Lineup Settings#
This is where you define how the lineup generator should behave.
You can set player positioning preferences, limits, and any rules that guide how players are assigned to positions inning by inning. In simple terms, this is where you tell the system how you want to coach, or which league rules you need to follow.
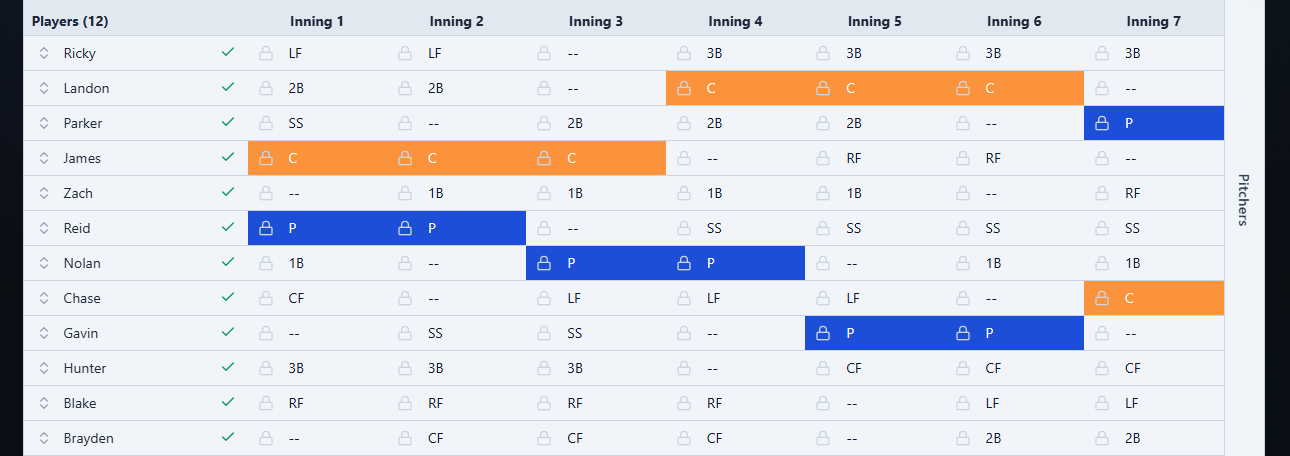
3. Defensive Grid & Toolbar#
The defensive grid is the heart of the lineup.
It shows your inning-by-inning defensive alignment and updates as you generate or adjust the lineup. You can also make manual changes here and drag players to adjust the batting order. This is where your plan comes together visually.
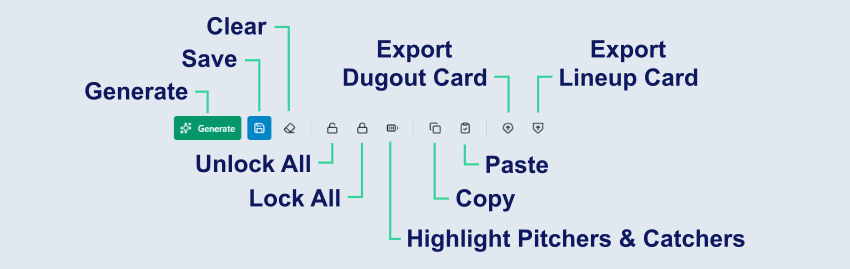
The toolbar is located above the grid.
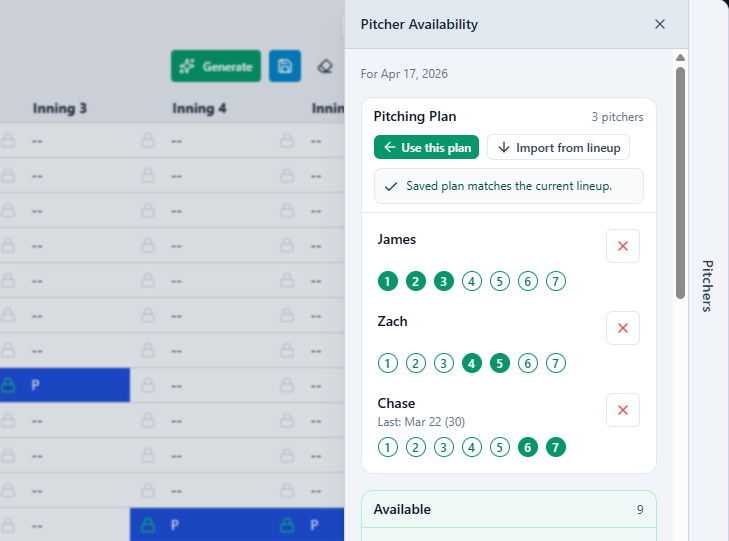
4. Pitcher Availability & Planning#
This panel helps you manage pitching for the selected game.
It shows which players are available to pitch based on recent workloads and your team’s pitcher rest rules. From here, you can build or adjust a pitching plan and apply it directly to your lineup.
This keeps your pitching decisions aligned with both availability and your overall game plan.
Building a Lineup Step by Step#
Here’s a simple, repeatable workflow to get the most out of the Lineup Builder.
Step 1: Select Your Game#
Start by selecting a game from the strip calendar above the lineup builder.
Everything you do - availability, pitching plans, and the lineup itself - is tied to that specific game. This keeps your planning organized and makes it easy to manage a full season.
 Strip calendar showing selected game
If you’re planning ahead, you can quickly move between games to compare or prepare multiple lineups in one session.
Step 2: Set Player Availability#
Before building anything, confirm who will actually be at the game.
Use the checkmarks next to each player’s name to mark availability. This ensures:
- You don’t accidentally plan for a player who won’t be there
- The generator only works with realistic options
It’s a quick step, but one of the most important.
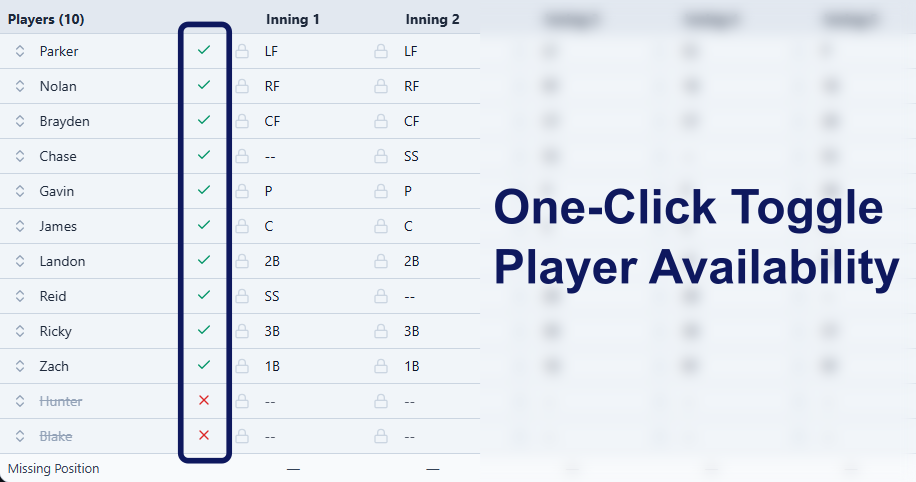
A clean availability setup prevents last-minute changes and keeps your lineup stable once the game starts.
Step 3: Decide on a Pitching Approach#
Next, decide how you want to handle pitching. You have three options:
- Set a pitching plan up front, like “Player A throws the first 3 innings, Player B the next 2, Player C the last 2”
- Let the generator choose pitchers based on your rules and constraints
- Hybrid where you create a partial pitching plan, like the first 3 innings, and let the generator fill the rest
If you already know your pitching plan, set it early so the lineup builds around it. If not, you can generate a lineup first and come back to refine pitching after.
This flexibility is key! You’re never locked into one approach.
Step 4: Confirm Player Positioning#
Take a look at your player positioning settings.
Preferred positions are weighted more heavily and will show up more often in generated lineups. This helps the lineup feel more natural and aligned with how you’d coach the game.
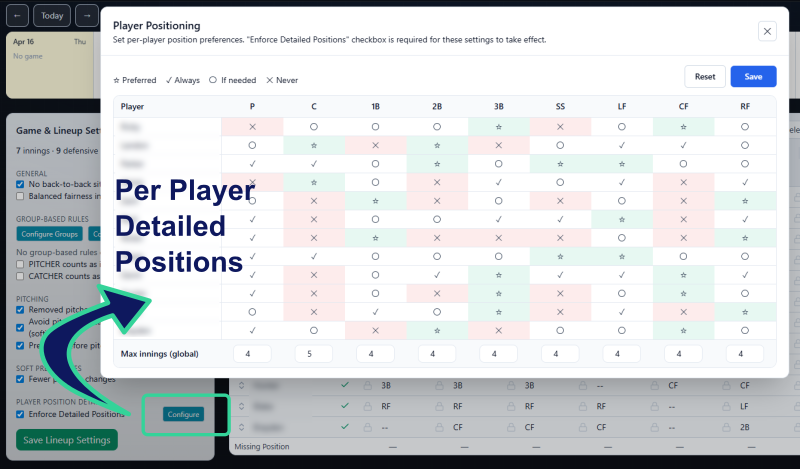 Configuration of player position and maximum position innings, per player.
This is where you guide the system, without having to manually assign every inning.
A good rule of thumb: set strong preferences for key positions or key players, and let the system handle the rest. The “Never” setting is a hard rule. For example, a player marked as “Never” for 1B will never be assigned to that position (when the “Enforce Detailed Positions” rule is checked).
Step 5: Apply Any League or Team Rules using Group Rules#
If your league has specific requirements, use Group Rules to configure and set them. Examples of group rules might include:
- “1st year players must pitch the first 2 innings”
- “3rd graders must pitch 2 of the first 5 innings”
There are two steps:
- Define the Group and assign players into the group.
- Define the rule using the group, including position requirement and applicable innings.
Create the Groups by clicking Configure Groups, adding a group name and checking the boxes next to the players who are included in that group. Here is an example of a “1st Year Players” group:

Next, configure a Group Rule, such as first year players must pitch 2 of the first 5 innings:
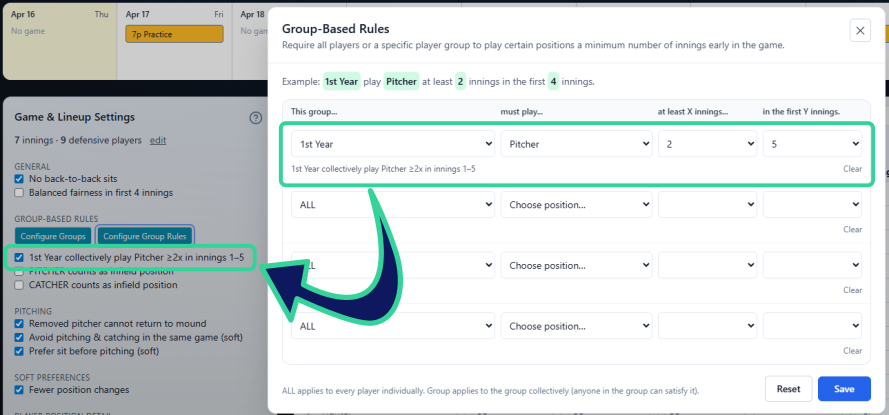
These rules ensure your lineup meets league expectations while still giving you flexibility everywhere else.
Once these are set, you don’t have to think about them again; they’ll be enforced automatically every time you generate a lineup.
Step 6: Generate and Iterate#
Now click the Generate button to generate your lineup.
The first result is your starting point, not the final answer.
 A good initial start fits all of the rules and is easy to finalize
From here:
- Lock in anything you like
- Regenerate to explore other options
- Make small manual adjustments where needed
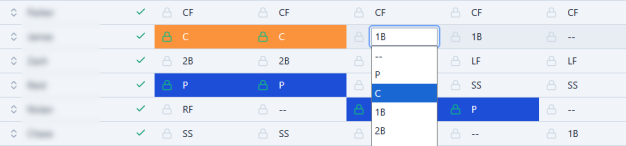 Manually set some positions as needed; locked cells will not be changed by the solver
This combination of structure and flexibility is what makes the lineup builder powerful.
Instead of starting from scratch, you’re refining a strong baseline in seconds.
Step 7: Save Your Lineup#
Once you’re happy with the lineup, save it by clicking the Save button. Saving a lineup includes the defensive grid, batting order, pitching plan and player availability. Save as you go, the lineup does not need to be complete before your first save.
When you save a complete lineup, you’ll see a checkmark next to the game in the calendar, letting you know that lineup is locked in and ready to go.
 Game with a saved lineup shows a checkmark.
Saving also ensures your work is there when you come back later, whether that’s before the game or during a quick adjustment. When you select the game again, the saved lineup is loaded to the grid.
Step 8: Export and Get Game-Ready#
When it’s time for the game, export your lineup materials.
You can generate:
- A dugout card for inning-by-inning positions to post in the dugout
- A lineup card for batting order and first inning setup for your coach’s meeting
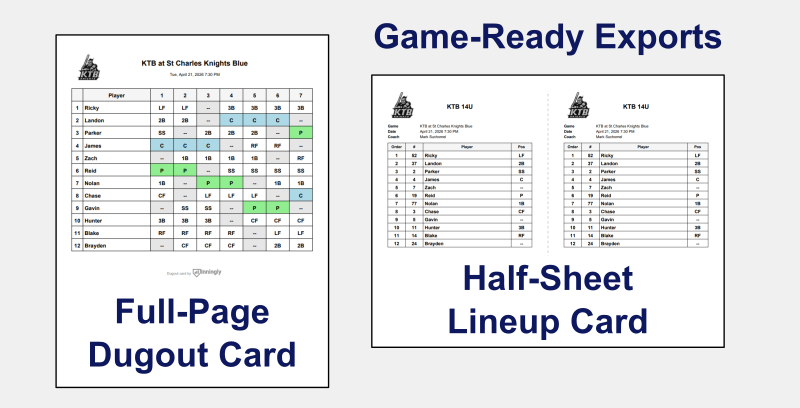
With one click, you’re ready to go from planning to game time.
Final Thought#
The lineup builder is at its best when you treat it as a partner, not just a tool.
Set clear expectations, generate a strong starting point, and make it your own. Over time, you’ll find a rhythm that saves you time and leads to better, more consistent lineups.
And that’s where the real advantage shows up, over the course of a full season.